Incident Reporting 101: How to Write a Compliant Incident Report
When something goes wrong in the workplace—whether it’s an injury, property damage, or even a near-miss—you need to document that incident. That’s where having an incident report form template comes in handy.
An incident report is a formal document that records details about an unexpected event. It captures what happened, who was involved, when and where it occurred, and any immediate actions taken. These reports help businesses track trends, improve workplace safety, and stay compliant with legal regulations.
A strong incident reporting process doesn’t just help fix problems after they happen—it helps prevent future incidents. By analyzing past reports, companies can identify patterns and take proactive steps to reduce risks. Plus, failing to report incidents can lead to regulatory penalties, lawsuits, and serious liability concerns.
In this guide, we’ll cover:
- Common types of incidents that should be reported
- Step-by-step instructions for writing a workplace incident report
- Examples of different types of incident reports
- Best practices for efficient incident reporting
Let’s go!
Common types of incidents that should be reported
While undesirable workplace events used to be referred to as “accidents”, OSHA now recommends using the term “incident” for all unwanted, unplanned events. This is because the term “accident” insinuates the event was random and not preventable. According to OSHA, nearly all worksite injuries, illnesses, and fatalities are preventable.
There are several types of workplace incidents that should always be documented, including:
- Injury or illness incidents: Any work-related injuries, from minor to serious accidents requiring medical attention, should be reported. This includes occupational illnesses caused by exposure to hazardous substances.
- Property damage incidents: If company equipment, machinery, or property is damaged due to an incident, it should be recorded to assess liability and determine preventive measures.
- Near misses: Incidents where no one was hurt and no damage occurred but had the potential to cause harm. Reporting near misses can help prevent future accidents.
- Security incidents: These involve threats, theft, vandalism, unauthorized access to company premises, and even data breaches.
- Environmental Incidents: Spills, leaks, or any hazardous substance release that could harm the environment should be reported.
- Violence or harassment: Any form of workplace violence, threats, or harassment should be documented and investigated.
- Equipment or system failures: When machinery malfunctions or a system failure causes a major disruption, it should be reported, especially if it poses a safety risk.
Businesses use incident reporting to identify key risk indicators and follow patterns over time, with the ultimate goal of preventing any similar incidents from occurring in the future.
Steps for writing a workplace incident report
A well-written incident report provides a clear, accurate, and detailed account of what happened. It should be factual, objective, and free from speculation or blame.
A typical incident report includes key details like:
- The date, time, and location of the incident
- Names and roles of those involved
- A step-by-step description of what happened
- Any injuries, damages, or immediate actions taken
- Witness statements and supporting evidence
- Possible causes and recommendations for prevention
Some workplaces have a standard incident report form that employees must fill out, while others require a more detailed written report. In either case, the form is just one part of the process—the goal is to create a thorough and useful record of the event.
Now, let’s see how to write an effective workplace incident report, step by step.
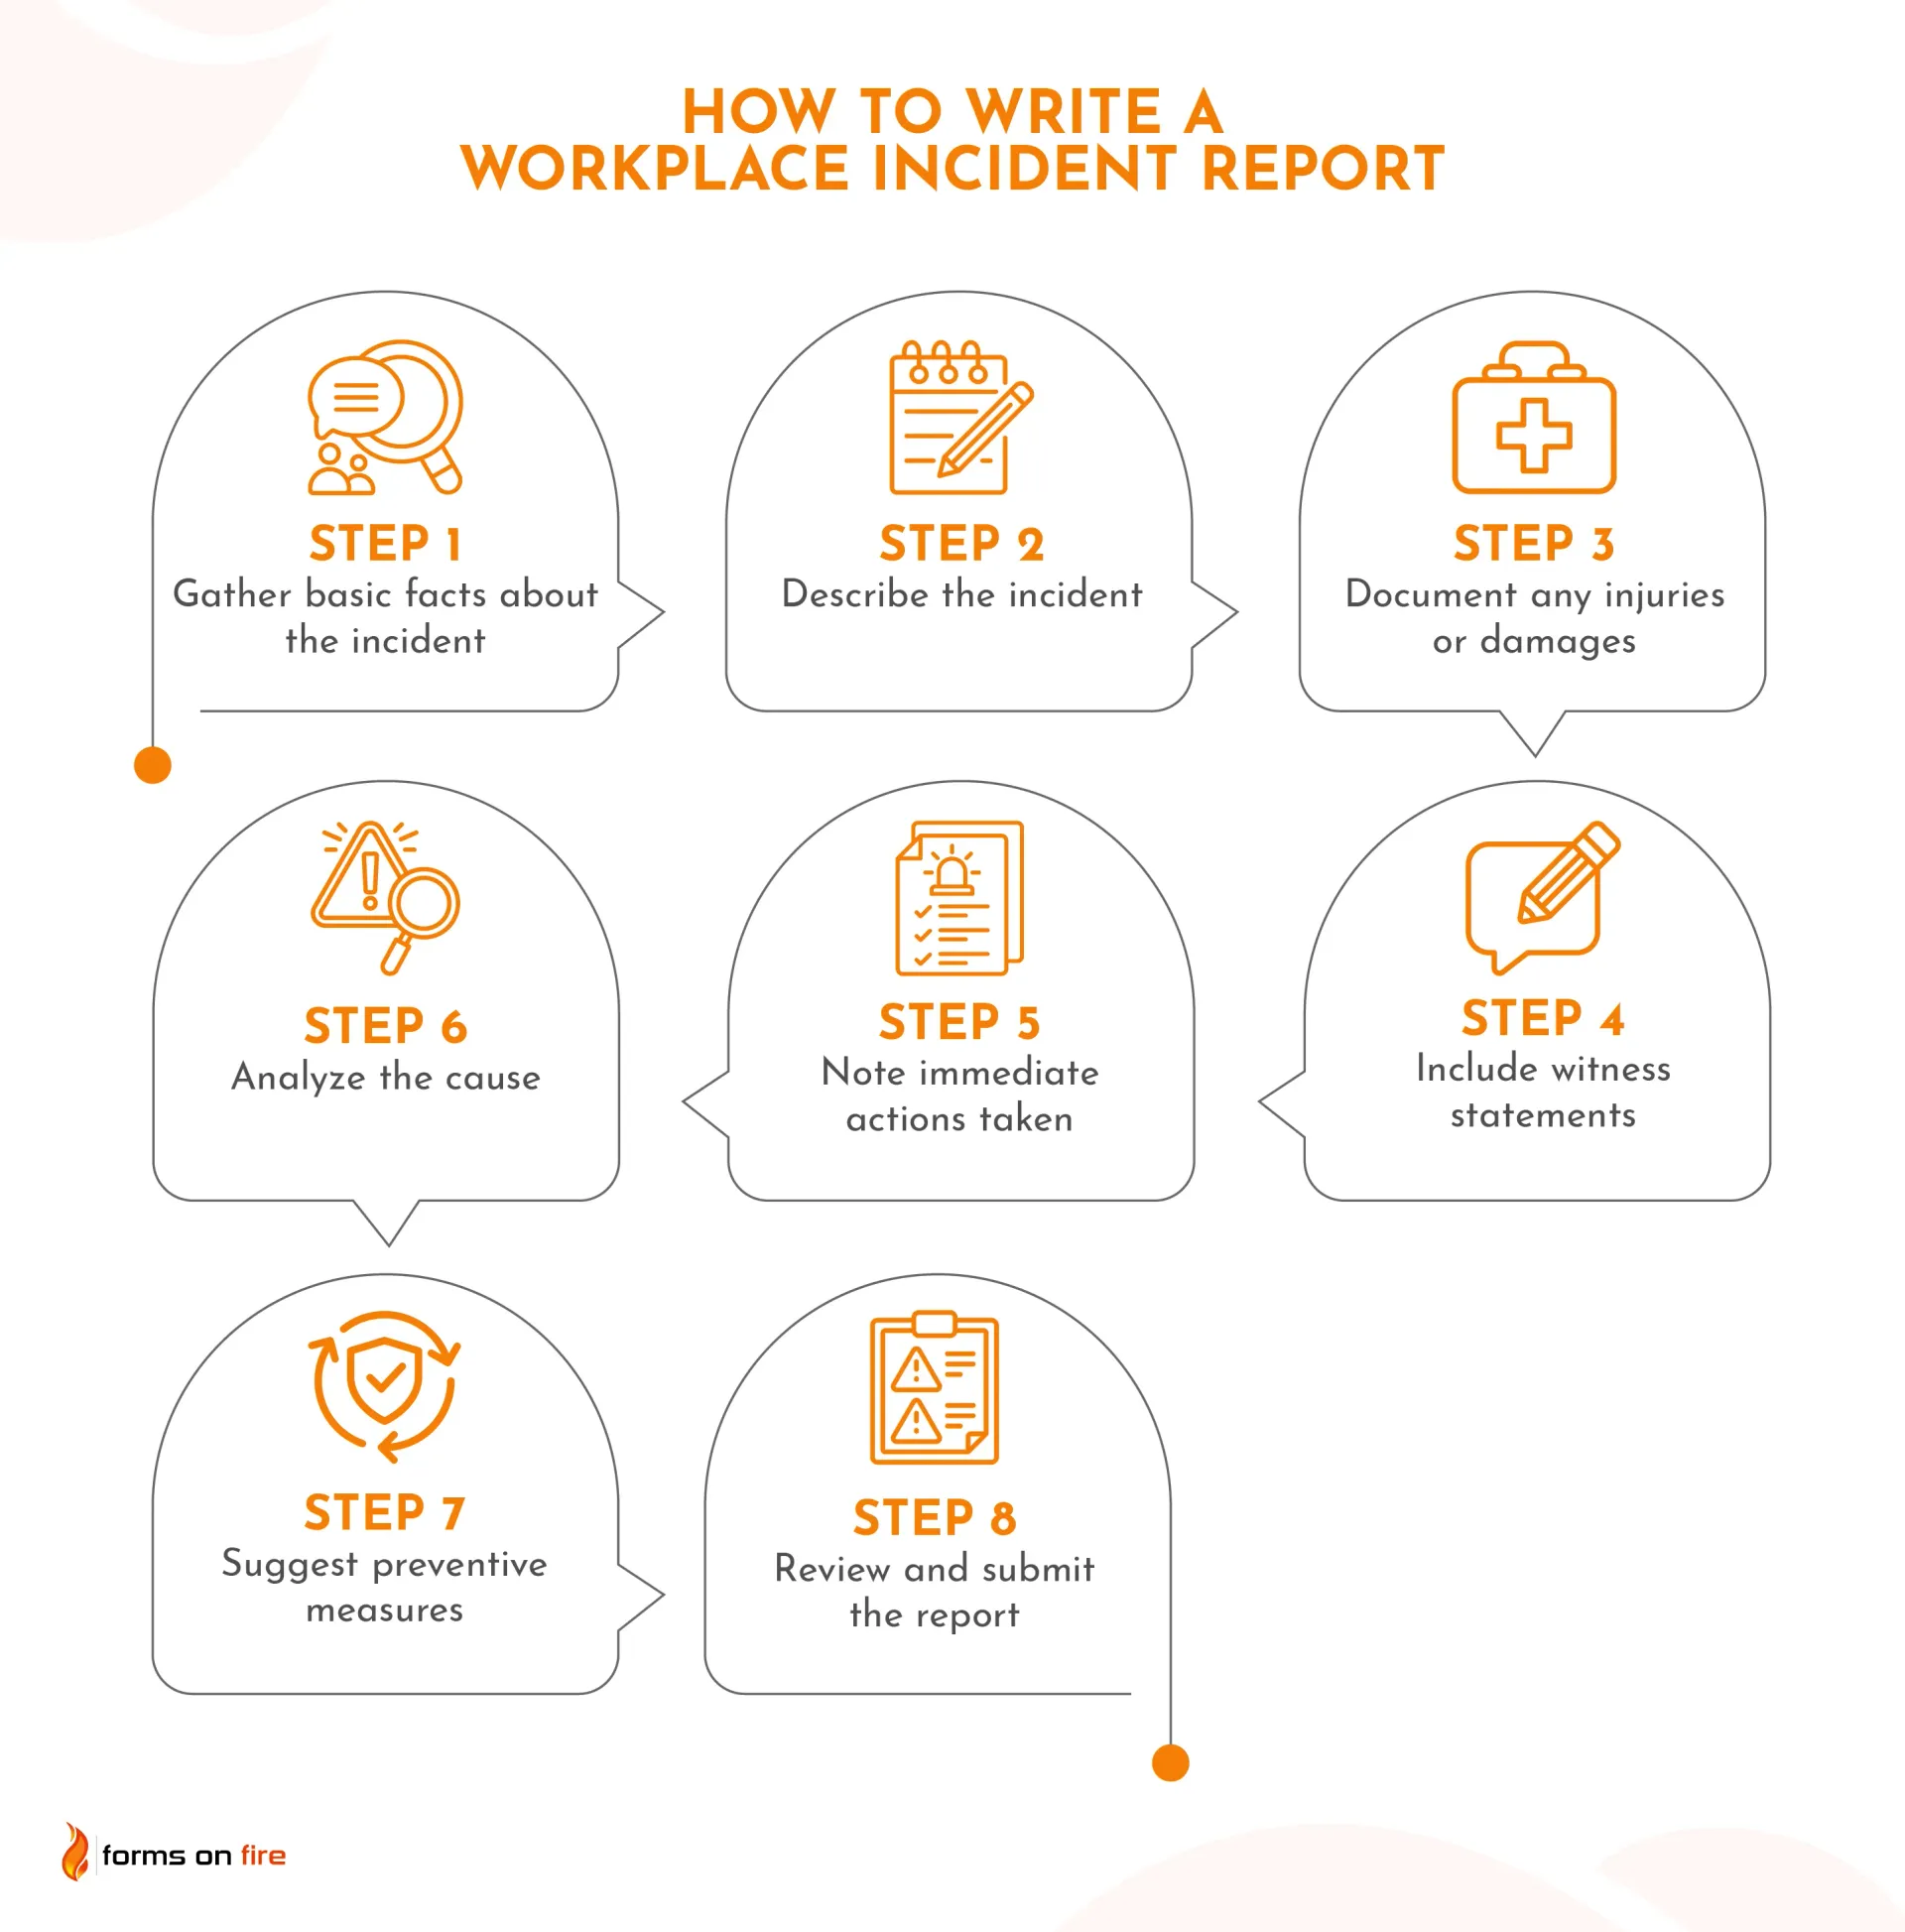
Step #1: Gather basic facts about the incident
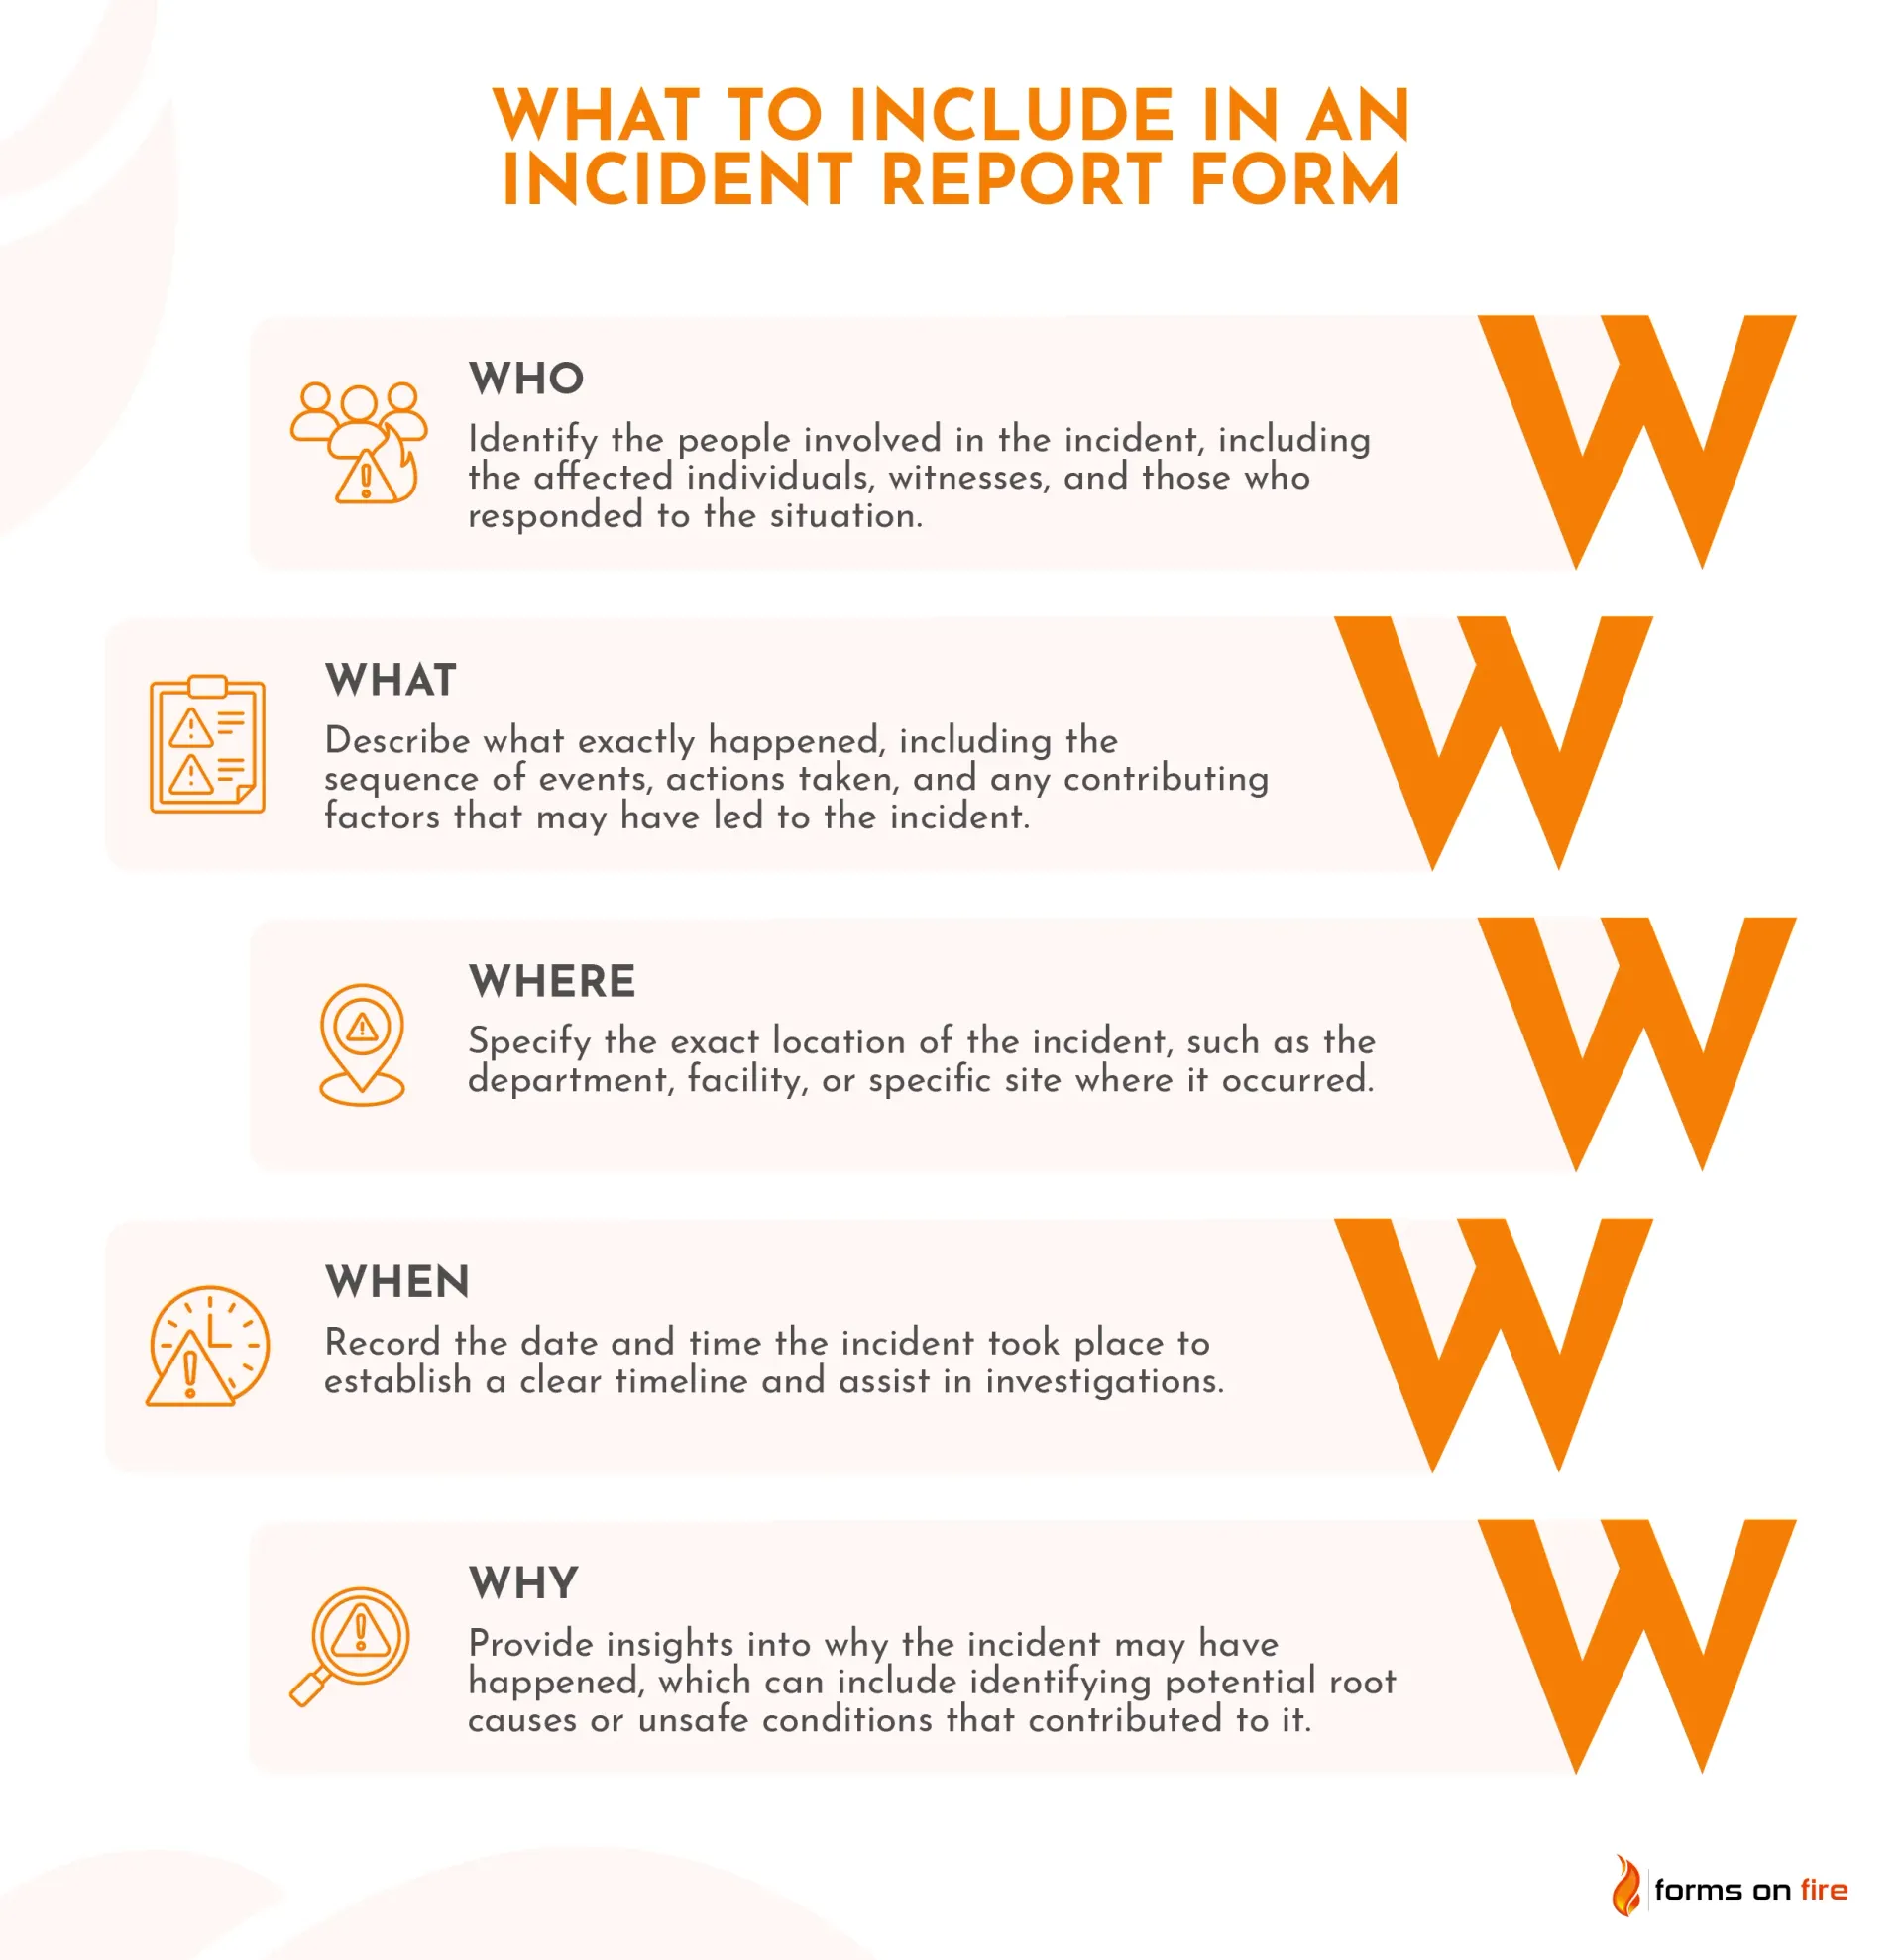
The first step in writing an incident report is collecting the fundamental details. These facts establish the
who, what, when, where, and why of the incident, ensuring that your report is clear and complete.
Accuracy is key in this step. Incorrect details can cause confusion, delay investigations, or even create legal issues. If you’re unsure about any information, clarify with those involved before finalizing this section.
Once you’ve gathered all the basic facts, it’s time to describe the incident in more detail.
Step #2: Describe the incident
the next step is to provide a detailed, objective account of what happened. This section should clearly explain the sequence of events, making it easy for anyone reading the report to understand the situation.
How to describe the incident effectively:
- Stick to the facts: Avoid making assumptions or assigning blame. Simply report what happened, who was involved, and how the incident unfolded.
- Write in chronological order: Describe the incident step by step, starting with what led up to it.
- Be specific: Use exact times, locations, and actions taken. Instead of saying “The employee was injured by a machine,” say “At 10:15 AM, while operating the conveyor belt in Section B, John Doe’s right hand was caught in the rollers.”
- Use neutral language: Avoid emotional or biased wording. Rather than saying “The worker carelessly walked onto the wet floor,” say “The worker slipped on the wet floor near the breakroom entrance.”
Here is an example of a well-written incident description:
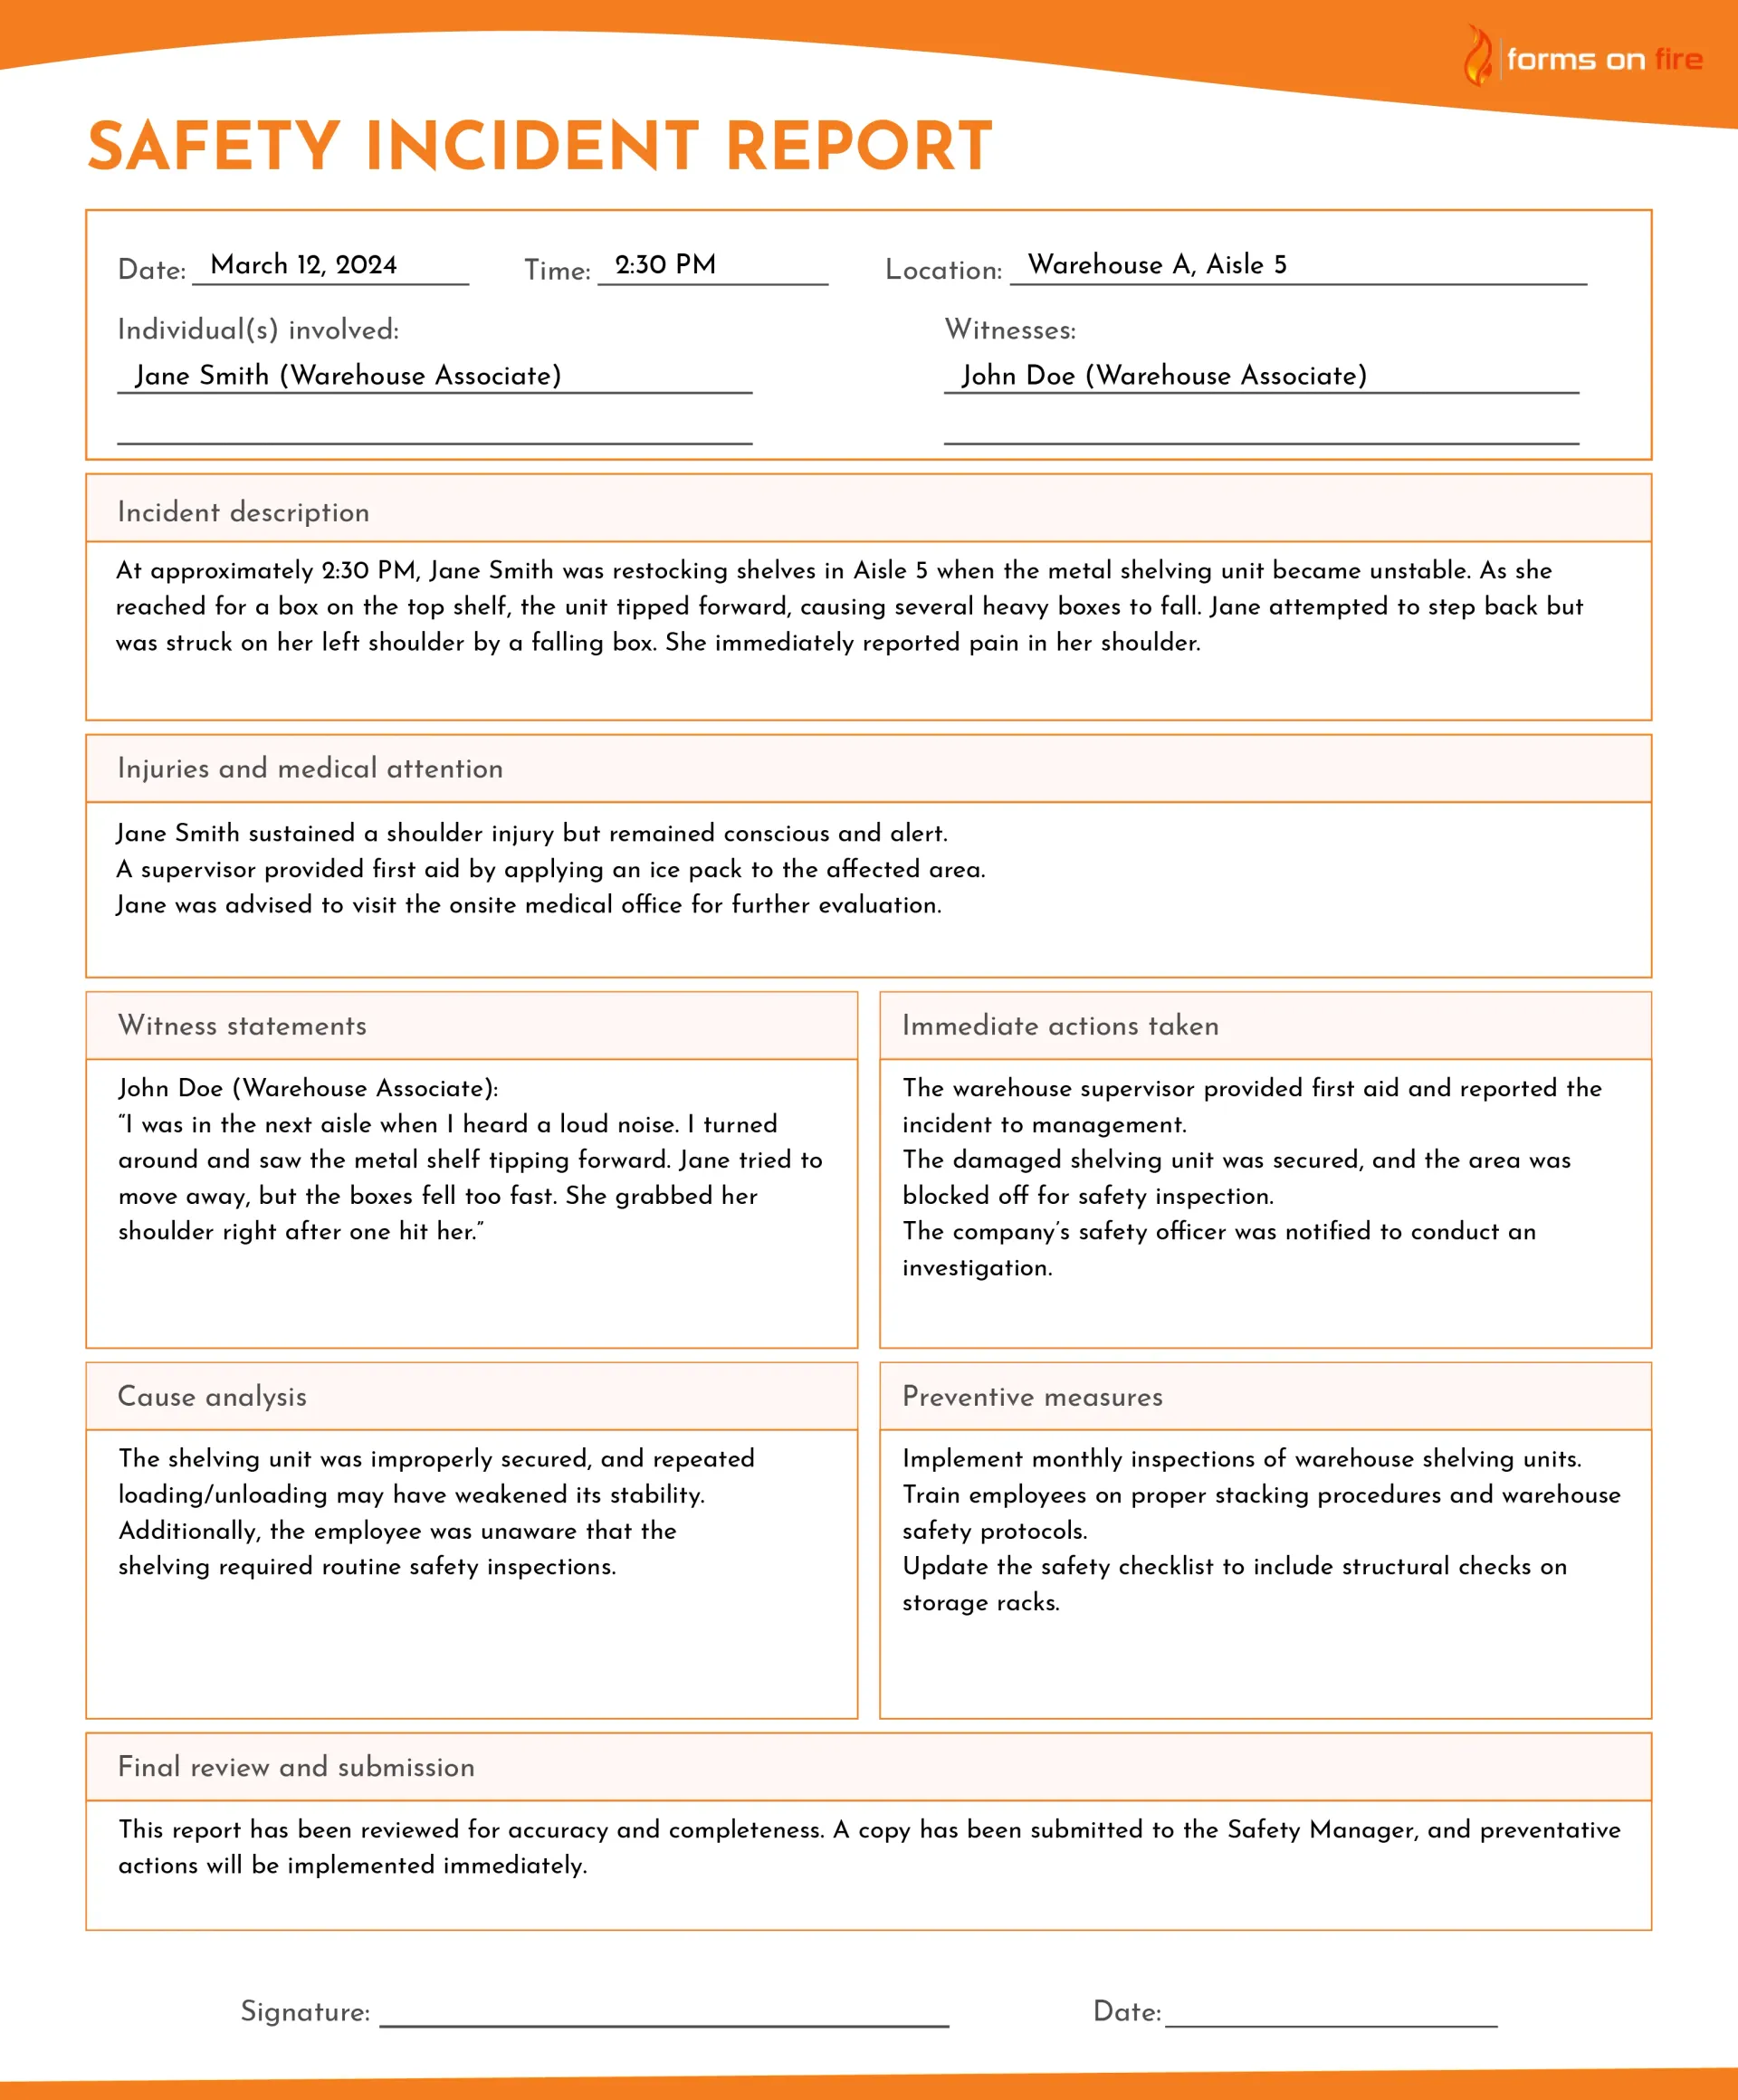
At approximately 2:30 PM on March 12, 2024, Jane Smith, a warehouse associate, was restocking shelves in Aisle 5. As she reached for a box on the top shelf, the metal storage unit became unstable and tipped forward. Jane attempted to move out of the way, but the shelf collapsed, causing several heavy boxes to fall. One box struck Jane on her left shoulder, causing immediate pain. Nearby employees heard the noise and called for assistance. The warehouse supervisor arrived within minutes and provided first aid before calling an on-site medic.
Once you’ve documented what happened, the next step is to record any injuries or damages that resulted from the incident.
Step #3: Document any injuries or damages
This information is crucial for medical treatment, insurance claims, and workplace safety improvements.
When talking about injuries, cover the following:
- Describe the type and severity of any injuries (e.g., cuts, bruises, fractures, burns).
- Note which part of the body was affected.
- Mention whether the injured person reported pain or discomfort immediately or later.
- Include any medical attention received, such as first aid or a trip to the hospital.
When reporting property damage, include:
- Specify what was damaged (e.g., machinery, office furniture, personal belongings).
- Describe the extent of the damage (e.g., minor dent, completely inoperable).
- If possible, include serial numbers or asset IDs for company-owned equipment.
If it makes sense, you can record a video or take some pictures that can be included in your final report.
Here is an example of a well-written injury/damage report:
After the shelf collapse in Aisle 5, Jane Smith reported pain in her left shoulder and had difficulty moving her arm. A supervisor provided first aid by applying an ice pack to reduce swelling. Jane was later taken to the onsite medical office for further evaluation. The warehouse shelves sustained moderate damage, with one unit bent beyond repair. The affected area was temporarily closed off for safety assessment.
If there were no injuries or damages, it’s still important to document this fact. You can simply state that "No injuries or property damage resulted from this incident." in your incident report.
Step #4: Include witness statements
Witness statements provide valuable third-party perspectives on the incident, helping to confirm details, clarify uncertainties, and ensure an objective record. If there were any witnesses, their statements should be included in the report.
A few tips for collecting and documenting these statements:
- Ask witnesses to describe what they saw: Keep questions neutral and fact-based. Instead of asking "Did you see the employee make a mistake?", ask "What did you observe?". Ensure they provide details in their own words, avoiding assumptions or opinions.
- Include key witness information: Full name, job title (if an employee) or relationship to the workplace (e.g., customer, visitor), and contact information (if required for follow-up).
- Use direct quotes: If a witness provides a particularly useful statement, quote them directly in the report.
A quick example of a witness statement entry:
John Doe, a fellow warehouse associate, witnessed the incident. In his statement, he said: “I was in Aisle 4 when I heard a loud noise. I turned around and saw the metal shelf tipping forward. Jane tried to step back, but she got hit by one of the falling boxes. She grabbed her shoulder right away and looked like she was in pain.”
Again, if no one witnessed the incident, the report should simply state: “No witnesses were present at the time of the incident.”
Step #5: Note immediate actions taken
Once the incident occurs, the immediate response can make a big difference in minimizing harm and preventing further risks. This section should document what actions were taken right after the incident and who was responsible for them.
This can vary widely depending on the type of incident that occurred:
- If someone was injured, record any first aid or medical assistance they received.
- Note whether emergency services, such as paramedics or an onsite medic, were called.
- If the injured person declined medical attention, document that as well.
- If security personnel, law enforcement, or emergency responders were called, include who arrived, when, and what they did.
- If an evacuation, lockdown, or other safety measure was initiated, mention it.
- Were any areas or equipment temporarily shut down?
- Were any hazards (e.g., spills, broken equipment) removed or fixed?
- Were employees notified about the incident to prevent further risks?
Here’s an example of an immediate actions report entry:
After the incident, the warehouse supervisor immediately provided Jane Smith with an ice pack for her shoulder and called the onsite medic. Jane was evaluated and advised to seek further medical attention if her pain worsened. The damaged shelving unit was secured to prevent additional hazards, and the area was temporarily closed for inspection. A safety officer was informed to conduct a risk assessment.
If no immediate actions were needed, you can write something like: “No emergency response or further action was necessary.”
Step #6: Analyze the cause
Once the immediate actions have been recorded, the next step is to determine why the incident happened. Identifying the root cause helps prevent similar events in the future.
When analyzing the cause of an incident, there are three main things to pay attention to.
Look for immediate causes:
- What directly led to the incident? (e.g., equipment failure, human error, environmental conditions)
- Was the employee properly trained for the task they were performing?
- Was the correct equipment or protective gear used?
Try to identify contributing factors:
- Were there any unsafe conditions? (e.g., slippery floors, poor lighting, lack of safety barriers)
- Did workload, fatigue, or distractions play a role?
- Were policies or procedures not followed, or were they unclear?
Check for safety violations:
- Did the incident involve a breach of safety protocols?
- Were OSHA regulations or company policies ignored?
- If yes, was this due to a lack of awareness, negligence, or insufficient enforcement?
Your cause analysis entry could be something like this:
The incident occurred because the warehouse shelving unit was improperly secured. Over time, repeated loading and unloading may have weakened its stability. Additionally, the employee was not aware that the shelving system needed routine safety checks. The warehouse floor supervisor confirmed that a regular inspection schedule was not in place for storage units.
Having this information helps organizations take meaningful action instead of just addressing surface-level issues.
Step #7: Suggest preventive measures
Once the cause of the incident is identified, the next step is to recommend actions that can prevent similar incidents from happening again.
More often than not, implementing preventive measures comes down to three areas: addressing root causes, improving policies and procedures, and recommending additional employee training.
Yet again, the exact recommendations will vary widely depending on the type of incident that occurred:
- If the incident was due to equipment failure, suggest more frequent inspections.
- If it was caused by human error, propose additional training or improved work procedures.
- If it was due to unsafe conditions, recommend facility modifications, like better lighting, signage, or safety barriers.
- If the potential risks are unclear, suggest further risk assessments or internal audits.
On top of that, you can also discuss:
- Are existing safety policies outdated or unclear?
- Would additional safety drills, supervision, or checklists help?
- Should reporting procedures be improved to catch hazards earlier?
- Should employees receive refresher training on safety protocols?
- Would toolbox talks or brief safety meetings help?
- Do employees need better access to personal protective equipment (PPE)?
An example of a preventative measures entry:
To prevent similar incidents, warehouse shelving units should undergo monthly stability inspections, and employees should be trained on proper stacking procedures. A new safety checklist will be implemented, and all employees will be required to complete refresher training on warehouse safety guidelines by the end of the quarter.
Preventative actions help turn lessons learned into real workplace improvements—it is a crucial part of incident reporting.
Step #8: Review and submit the report
Before submitting the report to the appropriate channels, you’ll want to review it for clarity, accuracy, and completeness. If you have followed our steps, you should be good to go.
During this final stage, focus on the following:
- Check for clarity and accuracy: Ensure all details are fact-based and free from assumptions or bias. Confirm that dates, times, locations, and names are correct. Make sure the sequence of events is logical and easy to follow.
- Verify completeness: Does the report include all of the necessary details we talked about? Are preventative measures clearly outlined? If supporting documents (photos, medical reports, equipment logs) are available, attach them.
- Submit the report: Incident reports are typically sent to a supervisor, manager, HR department, or safety officer. Some businesses may require a digital submission through an incident reporting system. Once submitted, a copy of the report should be kept for records.
Example of a final submission note:
This report has been reviewed for accuracy and completeness. All relevant details have been included, and necessary preventative measures have been recommended. A copy has been submitted to the Safety Manager and stored in the company’s incident tracking system.
Congratulations, you have just finished writing a world-class incident report!
Incident report examples
Understanding how to write an incident report is easier when you see real-world examples. Below, we’ll walk through different types of workplace incidents and how they should be documented.
Each example will try to follow the structured format we’ve outlined.
Safety incident report example (employee injury)
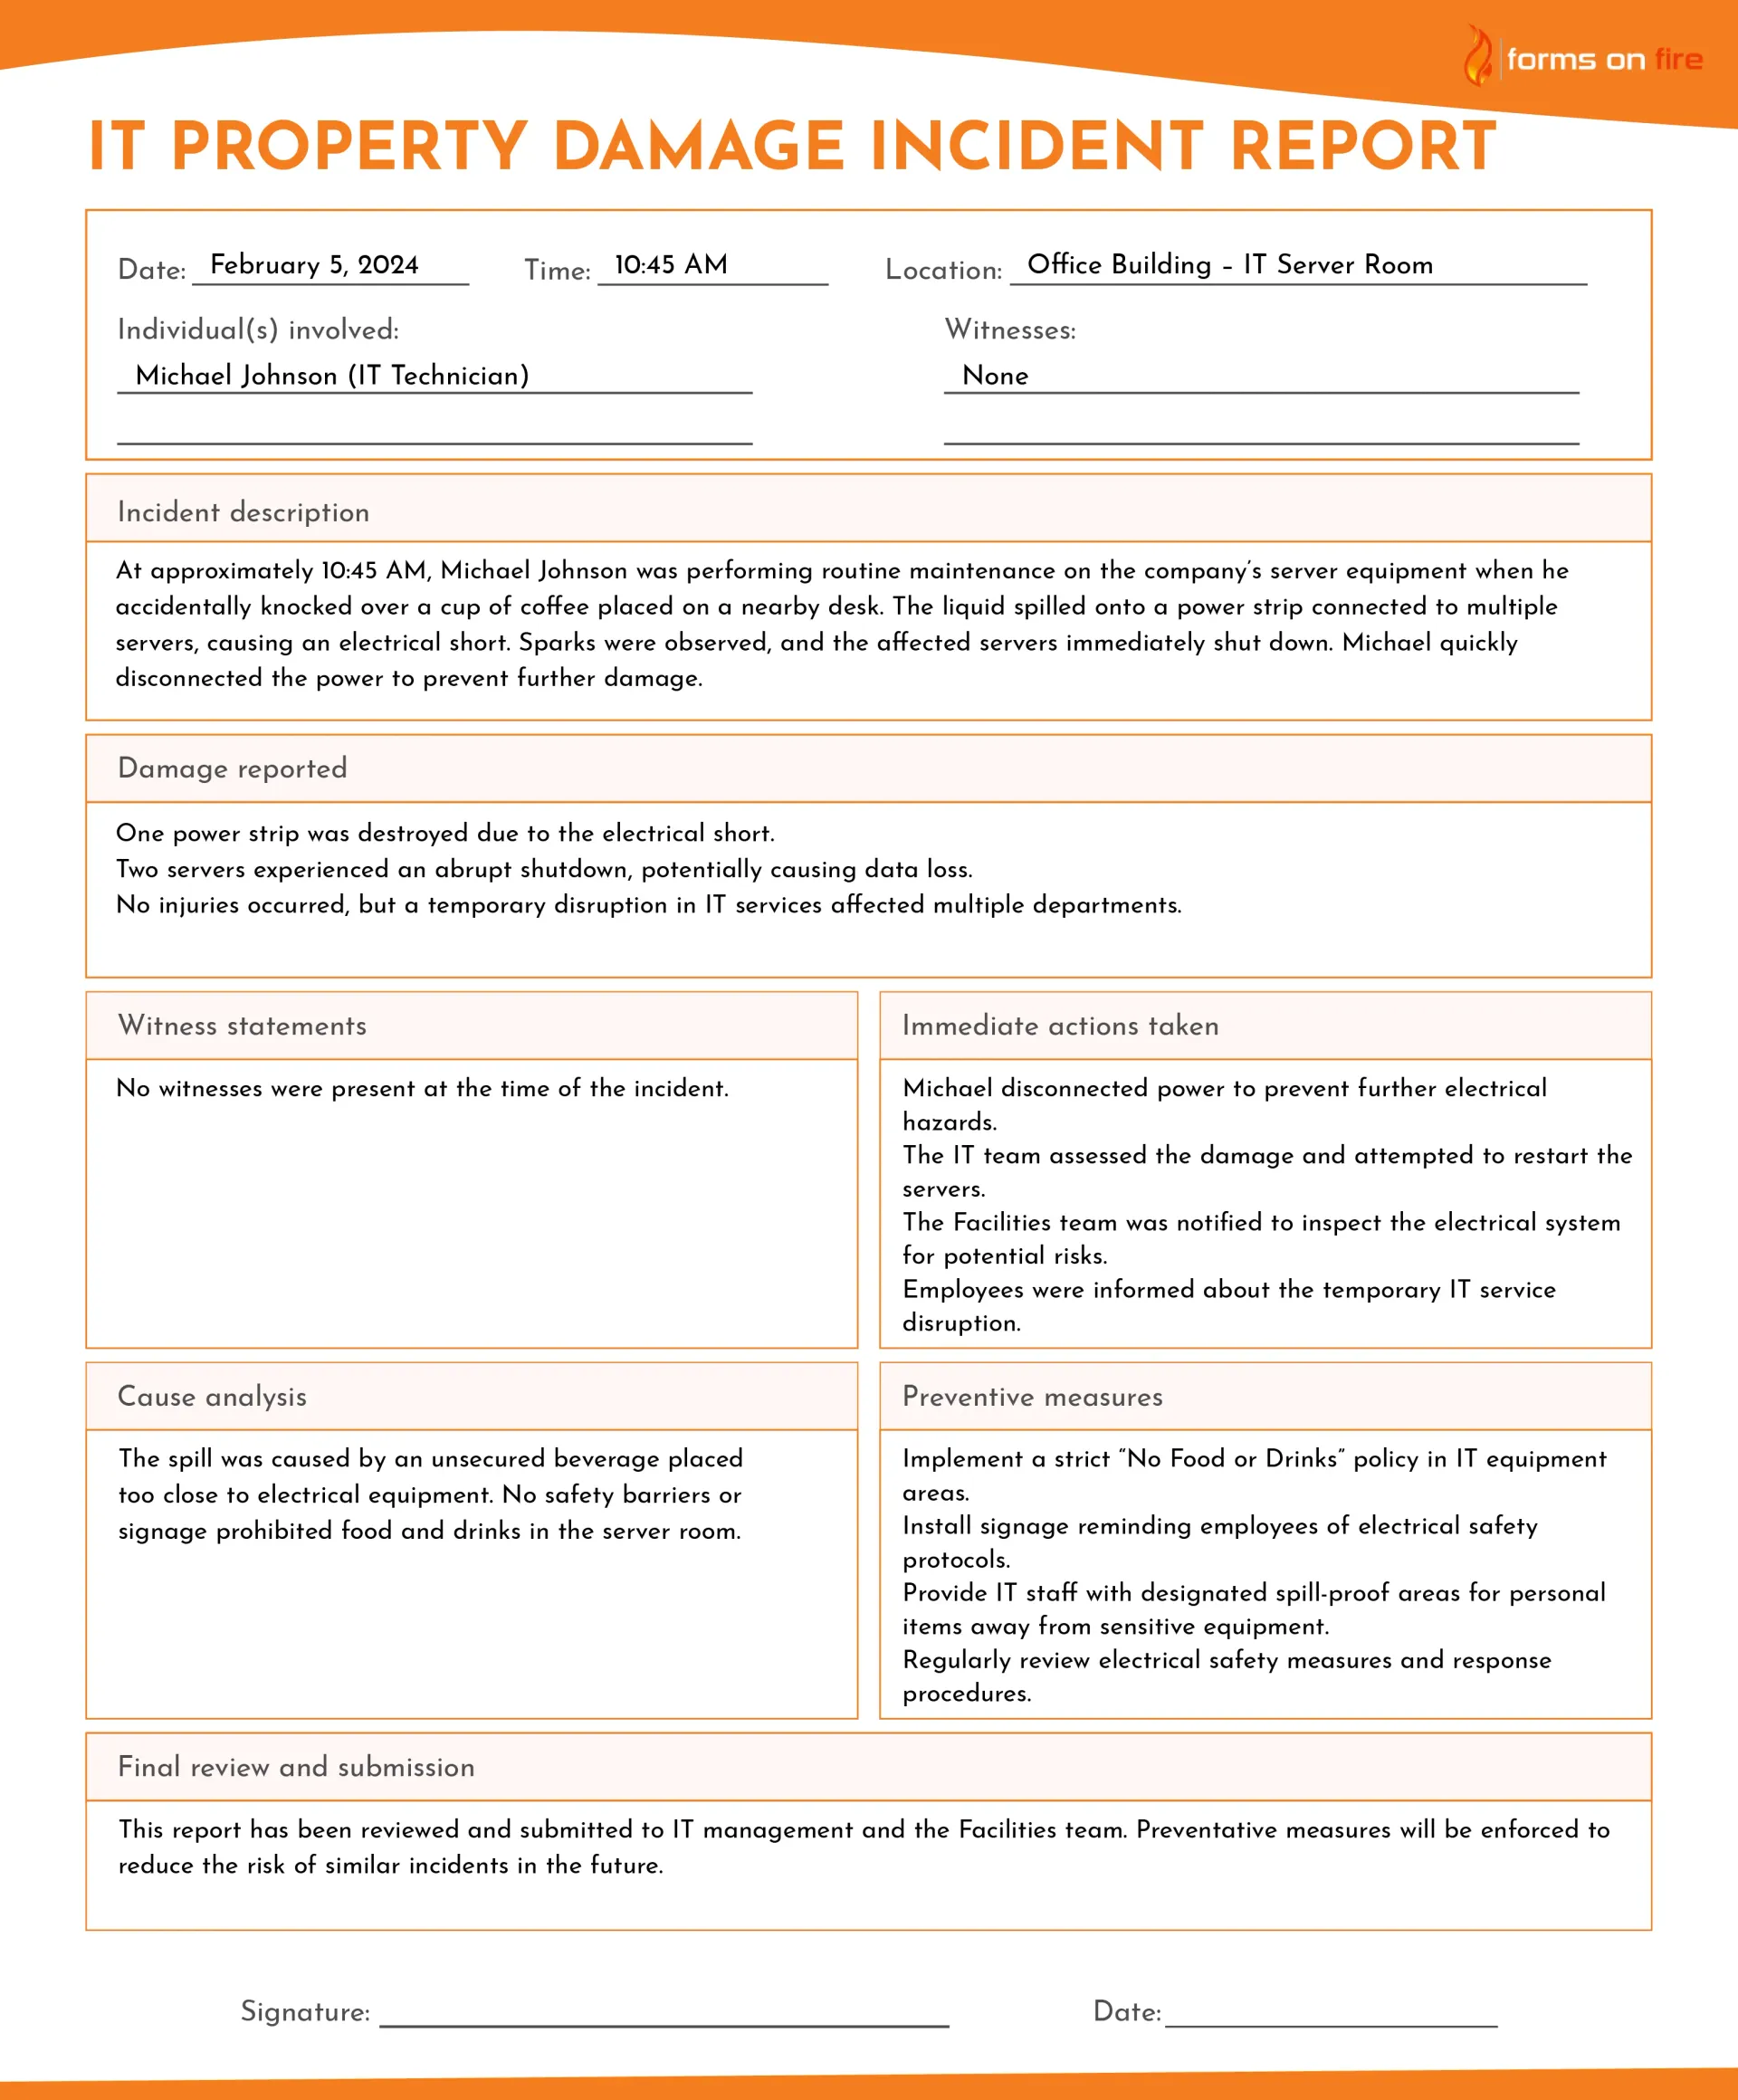
IT property damage incident report example
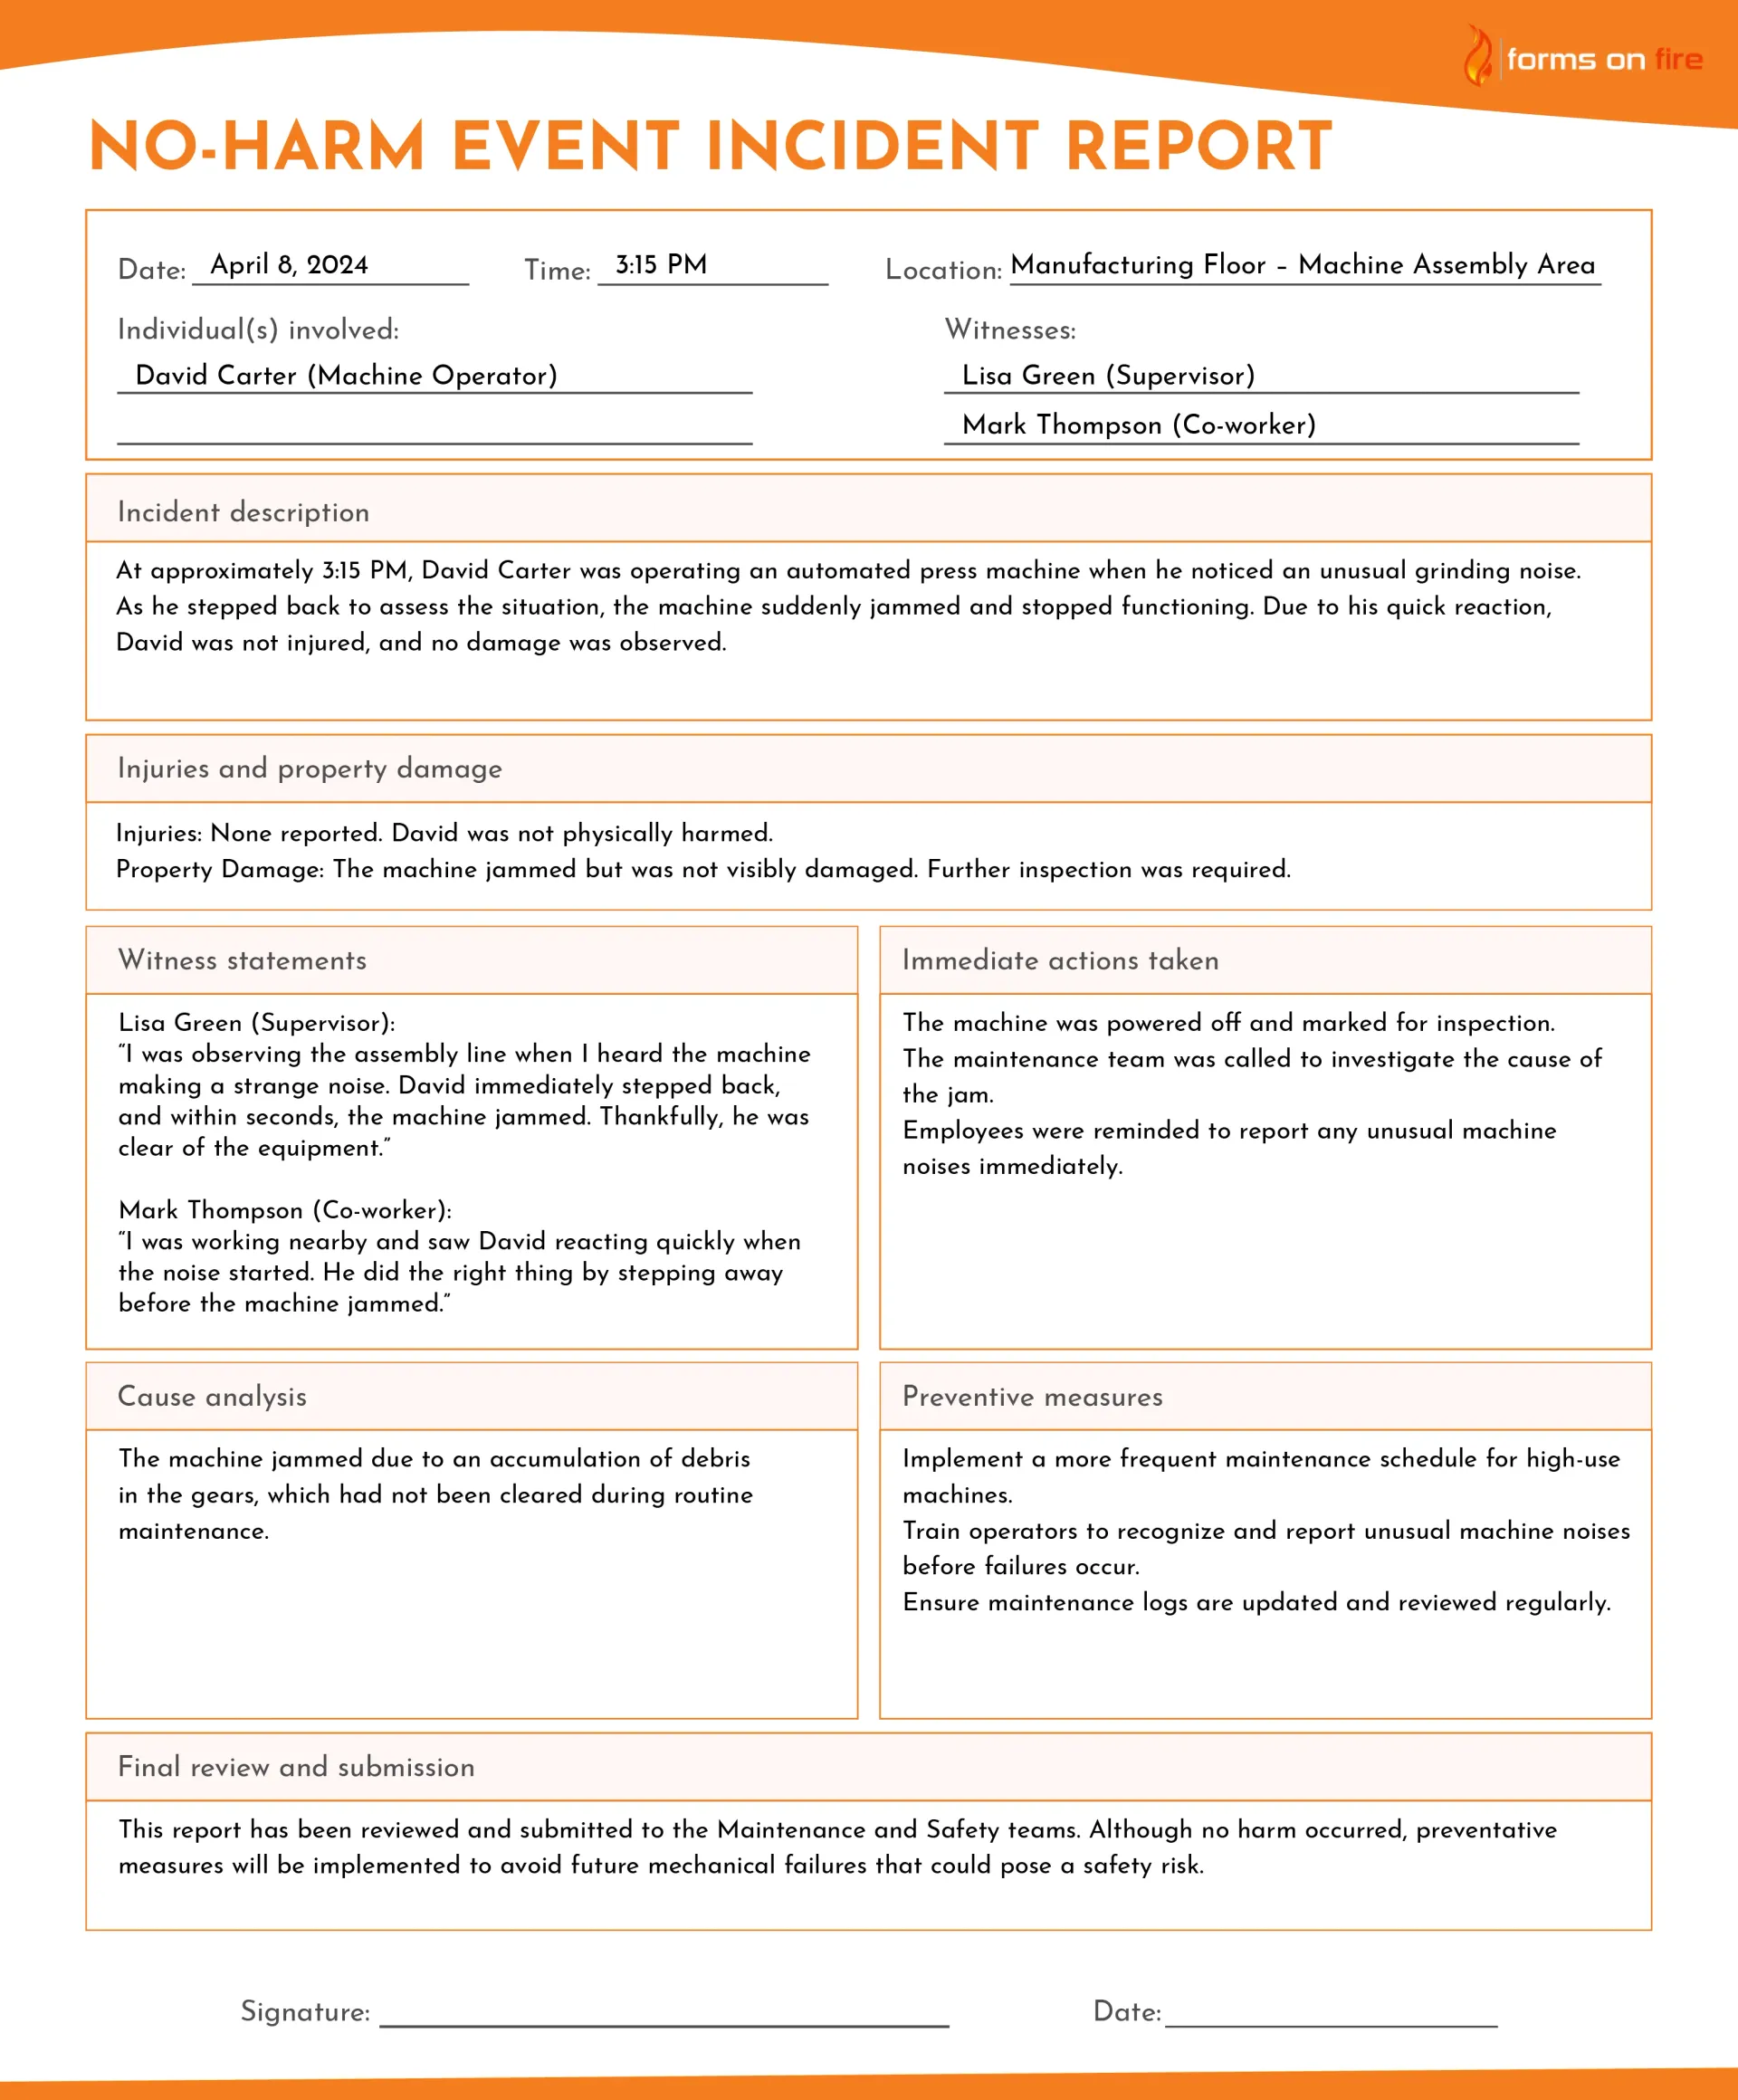
Near miss incident report example
Digitize incident reporting with Forms On Fire
Traditional pen-and-paper incident reports are slow, inefficient, and prone to errors. Paper forms get misplaced, handwriting can be unclear, and tracking trends over time is difficult. By digitizing incident reporting, you can improve accuracy, streamline compliance, and implement preventive measures much faster.
With Forms On Fire, you can build digital incident report forms that will help you standardize the process and get the right information, every time.
You can start a free trial of Forms On Fire, log in, find the incident report form template, adjust it to your needs, and deploy the form. Now, any of your employees and colleagues can use.
If you’re still not convinced, here are some additional reasons to use Forms On Fire to digitize incident reporting:
- Faster reporting and submission: Employees can fill out and submit reports instantly from a mobile device, tablet, or computer.
- More accurate data: Digital forms can include required fields, drop-down menus, and pre-filled information, ensuring reports are complete and standardized.
- Easier record-keeping and compliance: All reports are automatically stored in a central database, making it easy to retrieve records for audits, legal requirements, and trend analysis.
- Real-time notifications: When an incident is reported, the right people (managers, HR, safety officers) are notified immediately, allowing for a quicker response.
- Photo & video attachments: Digital reports allow employees to attach photos, videos, and voice notes to provide visual evidence and context around the incident.
- Trend tracking: Companies can analyze digital reports over time to identify recurring issues, safety risks, and areas for improvement.
- Integration: Forms On Fire platform can integrate with and forward data to almost any internal safety or EHS platform you might be using.
If you want to learn more, send us your questions or request a quick product demo. Our amazing team is always ready to help.
FAQ about incident reporting
Why is it important that incident reports are accurate and complete?
Accurate incident reports ensure proper investigation, help prevent future incidents, and protect businesses from legal and compliance issues. In contrast, incomplete reports can lead to misunderstandings, liability risks, and missed safety improvements.
Should you initiate an incident report on an event that only has a risk for injury?
In general, yes. Near misses and no-harm events should always be reported. They help identify hazards before they cause actual harm, allowing businesses to take preventive measures and improve workplace safety.
When should an incident report be completed?
As soon as possible after the incident occurs—ideally on the same day. Prompt reporting ensures that collected details are fresh and accurate. It also helps management respond quickly, investigate the cause, and take corrective action to minimize further risks.
What happens after an incident is reported?
After an incident is reported, it is reviewed by management, HR, or safety officers to assess the situation. An investigation may be conducted to determine the cause, document findings, and identify preventative measures.
If necessary, corrective actions—such as training, equipment updates, or policy changes—are implemented to prevent recurrence. The report is then stored for compliance, legal, and safety tracking purposes.
Does Forms On Fire provide tools or forms for incident reporting?
Yes. Forms On Fire offers customizable incident report templates that businesses can use to streamline reporting. These digital forms allow employees to submit reports from any device, attach photos, and automate workflows for faster response and compliance tracking.